In order to bring depth and dimension to a face (or body) we use highlighting and contouring. Using this technique you can drastically change your face shape and features. For the most part, dramatic contouring isn't for daily use, but more for special effects. Day to day, we can use contouring to slim the face, and create more defined features.
There are a couple of different products you can use to do this:
Powder
Powder is probably the easiest product to learn to contour with, as powders are easier to apply sheerly and then build up. You can purchase specialist contouring powders, such as MAC Sculpt and Shape Powders (currently pro only in the UK), but powder foundations a few shades darker than your skin tone also works well. Bronzers are also great for contouring if you have a warm skin tone, but stick to matte powders for a more natural effect. If you have a cool skin tone, be wary of using a bronzer as a contour powder, as often this are too warm. The powder should look like a shadow, not a tan. There are plenty of powder highlighters out there, which are lighter than your skin tone. You can use a light powder foundation, but I prefer proper highlighters, as they usually have a shimmer to them which reflects light.
Recommendations
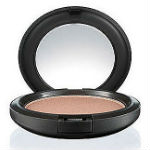
MAC Matte Bronze - A great bronzer for most skin tones, this matte bronzer can be layered to achieve a deeper colour.
| 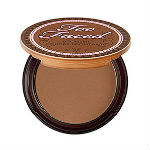
Too Faced Chocolate Soleil Bronzer - A choice of two colours means that paler skins are catered for too.
|
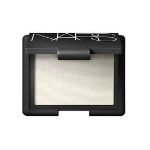
Nars Highlighting Blushes - A choice of four shades mean that every skin tone can find a good highlighter. They come in different colours, which means that deeper skin tones don't have to worry about a white highlighter turning ashy on them.
|
Liquid or Cream
My favourite way to highlight and contour is by using liquid foundation. You select a one which is couple of shades darker than the skin tone, and one a couple of shades lighter (usually white for those with paler skin). I like using foundations as they tend to look more natural, but they are harder to work with. The trick is just using a little at a time, blending, then layering until the desired effect has been achieved. Whilst using a light foundation does work for highlighting, I also like to layer a liquid highlighter on top, as these, like powder highlighters, have shimmer and light-reflecting particles in them, which give off a nice glow.
Recommendations
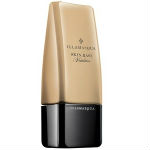
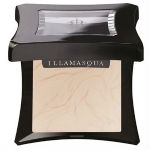
Illamasqua Skin Base Foundation - My go to foundation works really well as both a highlight and contour. You only need a tiny bit of this though!
| 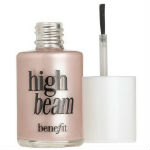
Benefit Highlighters - Benefit do a selection of highlighters, but my favourites are Highbeam and Sunbeam (and the discontinued Moonbeam if you can find it). Highbeam is great for cooler toned skins, while Sunbeam looks great on warmer, tanned skins.
|
Illamasqua Gleam Cream - Again, coming in two colours, gleam cream is a cream highlighter that can easily be layered to create a more dramatic effect.
|
Where to apply your highlight and contour
There are two basic rules to remember when highlighting and contouring - using a lighter product brings features forwards, whereas using a darker colour pulls things back. So to create defined cheek bone, you want to make your cheek bones stand out, so you bring them forwards using your highlighter product, and you want underneath your cheek bones sucked in, so you apply a contouring product to create the illusion of depth.
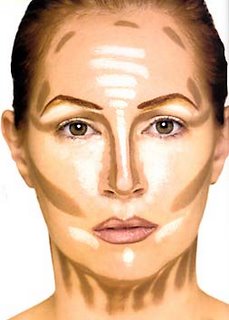
Above is a chart with the basic highlight and contour ares displayed. You don't need to use all of them, just the ones you feel you need to. For example, I like to contour my cheek bones and under my chin (bye bye double chin!) but I don't ever feel the need to do anything to my nose.
No comments:
Post a Comment